Loading...

Popcorn Ceiling Removal: A Step-by-Step Guide
Popcorn Ceiling Removal: A Step-by-Step Guide

If you own a house or apartment, you may have encountered an unusual textured ceiling. This could be a popcorn or cottage cheese ceiling. Other phrases that builders use to describe the bumpy ceiling include acoustic or stucco.

Stucco ceilings were a practical and affordable construction solution that homebuilders created by mixing ceiling paint with various materials. The materials that added the texture include:

  • Styrofoam
  • Vermiculite
  • The infamous asbestos

But for the most part, popcorn ceilings fallen out of favor with current homeowners. If you currently have a popcorn ceiling and don't know what to do, read on to find-out AFC Home's expert take on the pros and cons of having a popcorn ceiling. Additionally, the key steps to a safe and proper popcorn ceiling removal process.

The Pros and Cons of Removing the Popcorn Ceiling

The textured stucco ceiling presented a variety of advantages that contributed to its enhanced appeal more than fifty years ago. These benefits include:

  • Hiding Blemishes: The cottage cheese ceiling has a textured appearance that’s excellent at masking imperfections. The bumpy surfaces cast shadows that darken the surface, which hide any cracks, leaks, and poor drywall present.
  • Insulating Properties: Your popcorn ceiling’s bumpy texture can trap air, helping keep you cooler during summer and warmer in the winter. This feature promotes comfort all year round while lowering your energy consumption.
  • Noise Reduction: The thick and porous stucco ceiling surface helps to muffle and absorb noise. It can freshen up your indoor workspace acoustics especially when next to noisy, high-traffic entryways and the laundry room.
  • Inexpensiveness: How much did your popcorn ceiling cost? Well, the formulation and application process are pretty simple, resulting in a cost-efficient ceiling solution.

However, popcorn ceilings have become increasingly unpopular over time. Some of the reasons that are contributing to its decreased appeal include:

  • Difficult Maintenance: Popcorn ceiling repairs can be quite a hassle. You need to cut out any cracks or leaks, then find a matching color and texture to replace the damaged area. Finding the perfect match can be tricky without knowing the exact brand and material. Sometimes, you may end up starting from scratch to achieve a uniform ceiling.
  • Difficult Cleaning: Stucco ceilings require regular cleaning since dust and insects like nesting on the bumpy texture. The crevices allow for easy build up of dirt and cobwebs. These eyesores are difficult to clean out. Cleaning with a hard brush or vacuuming aggressively may cause popcorn pieces to break off.
  • Health and Safety Concerns: Older acoustic ceilings contain asbestos. While removing it protects you from potential lung problems, you need to do so carefully.
  • Need for Modern Aesthetic: Replacing popcorn ceiling with a smooth alternative adds a timeless elegance to your living space. The clean and streamlined look may even make your space feel brighter and more spacious.
  • Improving Your Home’s Value: Updating the popcorn ceiling with a smoother finish can enhance the resale value of your house. The new aesthetic may be increasingly appealing to modern home buyers.

Preparing for Popcorn Ceiling Removal

Here are a few safety measures you can consider while working on this home renovation project:

Wearing Protective Gear

Popcorn ceiling renovation exposes you to a lot of dust and debris. This can be dangerous if the ceiling contains lead-based paint or asbestos. Wearing the right popcorn ceiling removal safety equipment protects your body from these harmful particles. The gear includes:

  • Safety goggles
  • Headgear or hard hat
  • Respirator
  • Dust mask
  • Gloves
  • Disposable coveralls

Utilizing the Right Tools

The renovation process can be more hectic without the appropriate popcorn ceiling removal tools for the job. You can even damage the drywall underneath and require extensive repair afterwards. You’ll need a wide, sharp putty knife or specific popcorn scraper to gather the debris as you scrape. After removing the popcorn ceiling texture, you can utilize a drywall taping knife to level up the uneven areas. You also require:

  • A ladder to reach tall ceilings
  • A sprayer to dampen the textured ceiling
  • A variety of paintbrushes, whether small, angled, or roller-type
  • A primer that you’ll apply on the scraped ceiling before painting
  • A sander for popcorn ceiling sanding
  • A drywall or joint compound to fill in dents and gouges you create from the popcorn ceiling scraping process
  • A putty knife or drywall taping knife to help you apply the popcorn ceiling skim coat
  • A mud pan to collect debris

Preparing the Room

The DIY popcorn ceiling removal project can be a pretty messy job. Failing to prepare your space can leave you with a difficult cleanup process later. Start by removing all the furniture and interior decor. You also need to cover up the floor and walls with either a tarp or plastic sheeting. If you’re working in an isolated room, properly seal it up to prevent dust from spreading to other areas.

Safeguard Ceiling fixtures and Electric Boxes

Remember to switch off the circuit breaker before working on the ceiling fixtures or fans. This prevents any interference while you scrape up the wet popcorn debris. Alternatively, you can consider removing these fixtures beforehand to avoid water splashing on the electric components.

Prep for Proper Disposal of Materials

Once you’re through with the ceiling renovation, there’ll be plenty of materials that need disposal. Have your durable and properly labelled disposable bags ready to enable a safe cleanup. You’ll need to check with local guidelines on the best way to manage hazardous waste.

Key Steps in the Popcorn Ceiling Removal Process

Removing your popcorn ceiling is a fairly simple process that you can start by:

  • Spraying the Ceiling Surface: Fill the spray bottle with water and lightly damp the popcorn ceiling. Be cautious not to oversaturate the surface as it may harm the sheet rock beneath. You can work on small ceiling sections at a time to achieve the best outcome.
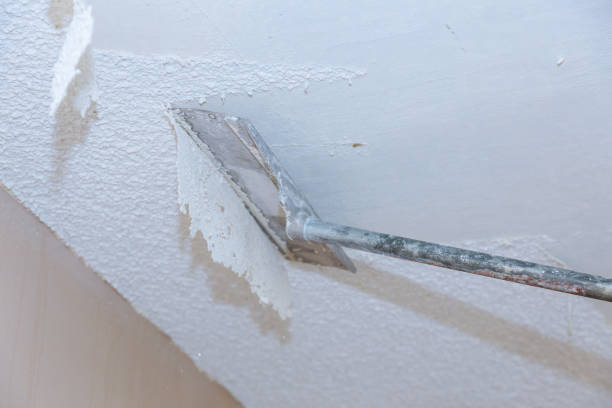
  • Scrape the Popcorn Ceiling: After lightly spraying a small ceiling section, wait a few minutes before you begin scraping away. Hold the scraper at a 45-degree angle to scrub off the now wet bumpy texture. You can move repeatedly in straight lines until you cover the entire ceiling. With the help of a mud pan catch the wet popcorn before it falls to the floor and creates a mess.
  • Cover Any Dents: Once you’ve cleared the bumps, use your drywall taping knife or putty knife to patch any imperfections with the joint compound. With this step, you achieve skim coating which entails applying a thin joint compound layer over a preexisting texture to establish a smoother surface.
  • olish the Patched Spots: Using sandpaper, gently polish the patched areas and any resilient rough spots to smoothen the ceiling.
  • Prime and Paint the Ceiling: Apply the primer to your polished ceiling before painting it with an angled brush or roller. While numerous types of ceiling paint are available, you can opt for a matte or flat finish to hide any imperfections.

Hire a Professional Contractor

Removing the popcorn ceiling may seem fairly simple at a glance. However, there's a major safety concern to consider. For homes built prior to the 1980s, asbestos could pose a serious health risk.

It's vital to have an expert contractor inspect your house and decide on the method for removing the popcorn ceiling. They can perform tests to check for asbestos and other hazardous materials before commencing any renovation projects.

If you’re removing popcorn ceilings from your bathroom, for example, consider contacting a trusted bathroom remodel contractor in your area.

Have Questions? Call Us NOW!

866-242-0629

AFC Home warranty logo featuring home shield
Copyright © AFC Home Warranty, 2023.
All Rights Reserved | Privacy Policy | Terms of Use
*Coverage may vary per state. Please review the sample contract for specific coverage, terms, and limitations.
States We Cover

Coverage not available in CA and HI