A QUICK GUIDE TO WATER HEATER MAINTENANCE
Like any appliance, a hot water heater requires some upkeep, but a few hours’ work each year can keep your unit heating water efficiently. Water heater maintenance requires only basic tools and supplies, and making minor repairs is easier and cheaper than installing a new unit. Plus, you’ll save on your utility bills and catch any leaks before you experience major water damage.
Outdoor cushions covers are subject to rain, pollen, sap, prolonged sunshine, and some pets love to lay on them (and even chew on them). If they are looking dirty or worn or smelling musty, take them off the cushions for a little TLC.
Most cushion covers do fine in the washing machine, but if you’d not subject your washer to that level of dirt, just scrub them with soapy water and rinse them with the hose. Hang them out to dry to preserve colors and prevent shrinkage.
Before performing any of the following actions, make sure the unit is off. For gas water heaters, turn the gas supply to OFF. Electric units should be turned off at the breaker..
Water coming from a water heater is HOT and can scald, so wear gloves, safety eyewear, and protective clothing when working. It’s always a good idea to let the unit cool for awhile once you have turned the unit off.
You can cool the unit more quickly after turning it off by running a few of the hot water faucets in the home, allowing cold water to enter the tank. Make sure to turn the cold water supply off before trying to drain the tank.
The pressure relief valve, also called a T&P (temperature and pressure) valve, is attached to the top or side of the water heater. If the unit builds excess pressure inside, the valve opens, allowing water to flow out through the discharge pipe. If the valve is not operating properly, the pressure within the tank can build until the tank explodes.
First, double check that the unit is off. Next, turn off the cold water supply. If necessary, place a bucket under the discharge pipe coming from the valve.
Gently lift the tab on the valve. Some water should come out. If it doesn’t, the valve may need to be replaced. A little bit of water vapor may come out as well—that’s normal.
Let the tab go back to its original position and check that the flow of water stops. If the water does not stop flowing, the valve needs to be replaced.
To replace the valve, first partially drain the tank so the water level is below the level of the valve. Remove the discharge pipe by turning it counterclockwise. Then remove the valve the same way (a wrench or plumbing wrench helps here).
Apply teflon tape to the threads and screw on the new valve. Tighten with a wrench, making sure that the open end of valve on the faces its original direction, which is usually straight down towards the floor. Reattach the discharge pipe, using teflon tape again.
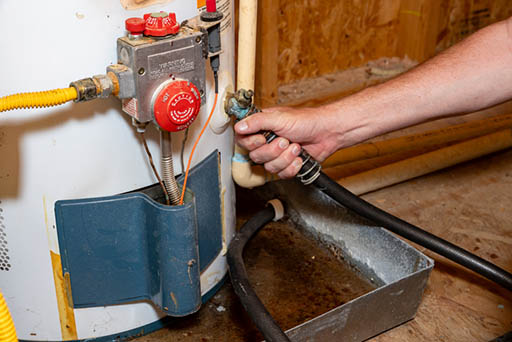
As water flows through the unit, sediment builds up at the bottom of the storage tank. Excess sediment reduces efficiency and can lead to rust. When your tank is leaking from the bottom, sediment is often the cause.
Luckily, this is one of the easier water heater repairs. All tanks have a drain valve, allowing homeowners to remove the sediment without tools.
Screw a garden hose onto the threaded end of the valve. The water coming out of the hose will be very hot and dirty, so be careful where you put the other end of the hose.
Turn the valve counterclockwise to open the valve. Water should begin flowing out—if it doesn’t, you may have a clogged valve. You don’t have to drain the entire tank, but make sure to keep going until the water coming out is clear.
When you’re done, make sure to close the valve before taking the hose off of the valve.
The anode rod, usually made out of magnesium or aluminum, keeps the water heater tank from corroding. It is often called a sacrificial rod, meaning that it stops tank corrosion by becoming corroded itself, so it’s important to check and see if they need replacement.
To check the rod, first make sure that the unit is off (notice how we keep saying that?). Unscrew the hex bolt at the top of the unit and pull the rod out.
The rod needs to be replaced if it’s less than ½ inch thick or coated with calcium. At minimum, you should check the anode rod every three years.
Most water heaters have a temperature dial on the front near the bottom of the unit. The standard temperature is 120 degrees—you may need a flat-head screwdriver to adjust.
In general, reducing the temperature by 10 degrees saves 5 percent on monthly energy costs.
Take a close look at the plumbing lines leading to and from the water heater. All pipes and connections should be dry. If any lines have condensation on them, they should be insulated. Condensation can collect and deposit water on floors, walls, or the top of the water heater, leading to rust.
re-slit foam pipe insulation or pipe insulation wrap is inexpensive and can be purchased at any home improvement store. Applying insulation to plumbing is easy.
Once you’re finished checking your unit and have made any repairs, it’s time to turn it back on. Open the valve that controls the cold water supply to refill the tank. Once the tank is full again, power the unit on.
For electric units, this involves turning the circuit breaker back on. For natural gas water heaters this requires relighting the pilot light—instructions are printed on the front of the unit.

Coverage not available in CA, WA and HI